SSH Remote IoT Device Android is a crucial topic for anyone interested in managing and controlling Internet of Things (IoT) devices remotely. With the increasing number of IoT devices being integrated into our daily lives, the ability to access and manage these devices securely from an Android device is more important than ever. This article will guide you through everything you need to know about using SSH to remotely control IoT devices from your Android smartphone or tablet.
As IoT devices become more prevalent, the need for secure and efficient remote access has grown exponentially. Whether you are a developer, a tech enthusiast, or simply someone who wants to manage their smart home devices from anywhere, understanding how to use SSH on Android can be a game-changer. In this guide, we will explore the benefits, tools, and best practices for establishing secure connections to IoT devices using SSH.
By the end of this article, you will have a clear understanding of how to set up and use SSH on your Android device to manage IoT devices. We will cover everything from the basics of SSH to advanced configurations, ensuring that you have all the information you need to get started. So, let’s dive in and explore the world of SSH remote IoT device management on Android.
Read also:Exploring The Life Of Simone Biles Husband A Comprehensive Insight
Table of Contents
- What is SSH?
- Benefits of Using SSH for IoT Device Management
- Top Tools for SSH on Android
- How to Set Up SSH on Your Android Device
- Connecting to IoT Devices via SSH
- Security Tips for SSH Remote Access
- Troubleshooting Common SSH Issues
- Advanced SSH Configurations for IoT Devices
- Best Practices for Managing IoT Devices Remotely
- Conclusion
What is SSH?
SSH, or Secure Shell, is a cryptographic network protocol used for secure data communication, remote command execution, and other secure network services between two networked devices. It was designed as a replacement for insecure protocols like Telnet and provides a secure channel over an unsecured network.
SSH is widely used in the world of IoT because it allows users to remotely access and manage devices securely. With SSH, you can execute commands, transfer files, and configure settings on IoT devices without being physically present. This is particularly useful for managing devices in remote locations or for automating tasks.
How SSH Works
SSH operates on a client-server model. The client, in this case, your Android device, initiates a connection to the server, which is the IoT device you want to manage. Once the connection is established, all data transmitted between the client and server is encrypted, ensuring that sensitive information remains secure.
Benefits of Using SSH for IoT Device Management
Using SSH to manage IoT devices remotely offers several advantages, especially when it comes to security, flexibility, and ease of use. Below are some of the key benefits:
- Enhanced Security: SSH encrypts all data transmitted between your Android device and the IoT device, protecting it from eavesdropping and unauthorized access.
- Remote Access: With SSH, you can manage IoT devices from anywhere in the world, as long as you have an internet connection.
- Automation: SSH allows you to automate tasks on IoT devices, such as running scripts or updating firmware, without manual intervention.
- Cross-Platform Compatibility: SSH works across different operating systems, making it a versatile tool for managing IoT devices regardless of the platform they run on.
These benefits make SSH an indispensable tool for anyone managing IoT devices, whether for personal or professional purposes.
Top Tools for SSH on Android
To use SSH on your Android device, you will need a reliable SSH client. Fortunately, there are several excellent options available on the Google Play Store. Below are some of the most popular and trusted SSH clients for Android:
Read also:Raspberry Pi Ssh Client A Comprehensive Guide For Beginners And Experts
1. Termux
Termux is a powerful terminal emulator for Android that provides a Linux-like environment. It includes an SSH client by default, making it an excellent choice for managing IoT devices. With Termux, you can execute commands, transfer files, and even run scripts directly from your Android device.
2. JuiceSSH
JuiceSSH is a user-friendly SSH client designed specifically for Android. It offers a clean interface, support for multiple connections, and advanced features like SSH key management. JuiceSSH is ideal for both beginners and experienced users.
3. ConnectBot
ConnectBot is a free and open-source SSH client for Android. It is lightweight, easy to use, and supports SSH key authentication. While it may not have as many features as JuiceSSH, it is a reliable option for basic SSH tasks.
How to Set Up SSH on Your Android Device
Setting up SSH on your Android device is a straightforward process. Below are the steps to get started:
Step 1: Install an SSH Client
First, download and install an SSH client from the Google Play Store. Popular options include Termux, JuiceSSH, and ConnectBot. Once installed, open the app and familiarize yourself with its interface.
Step 2: Generate SSH Keys
To enhance security, it is recommended to use SSH key authentication instead of passwords. Most SSH clients allow you to generate SSH keys directly within the app. Follow the instructions provided by your chosen client to create a public and private key pair.
Step 3: Configure the IoT Device
On the IoT device you want to manage, ensure that the SSH server is enabled. You may need to configure the device’s settings to allow SSH connections. Once configured, note down the device’s IP address and port number, as you will need these to establish a connection.
Connecting to IoT Devices via SSH
Once your Android device and IoT device are set up, you can establish an SSH connection. Follow these steps:
Step 1: Open the SSH Client
Launch your SSH client app and create a new connection. Enter the IoT device’s IP address, port number, and authentication details (either a password or SSH key).
Step 2: Establish the Connection
Click the “Connect” button to establish the SSH connection. If everything is configured correctly, you should see a terminal window where you can execute commands on the IoT device.
Step 3: Execute Commands
Once connected, you can run commands to manage the IoT device. For example, you can update firmware, restart services, or check system logs.
Security Tips for SSH Remote Access
While SSH is a secure protocol, there are additional measures you can take to enhance security:
- Use Strong Passwords: If you must use password authentication, ensure that your passwords are strong and unique.
- Enable Two-Factor Authentication (2FA): Adding an extra layer of security can prevent unauthorized access.
- Restrict Access: Limit SSH access to specific IP addresses or networks to reduce the risk of attacks.
- Keep Software Updated: Regularly update your SSH client and IoT device firmware to patch vulnerabilities.
Troubleshooting Common SSH Issues
While SSH is generally reliable, you may encounter issues from time to time. Below are some common problems and their solutions:
1. Connection Refused
If you receive a “Connection Refused” error, ensure that the SSH server is running on the IoT device and that the correct port is open.
2. Authentication Failed
Double-check your username, password, or SSH key. Ensure that the key is correctly configured on both the client and server.
3. Slow Connection
A slow connection may be due to network issues or high server load. Try connecting from a different network or at a different time.
Advanced SSH Configurations for IoT Devices
For users who want to take their SSH setup to the next level, there are several advanced configurations you can implement:
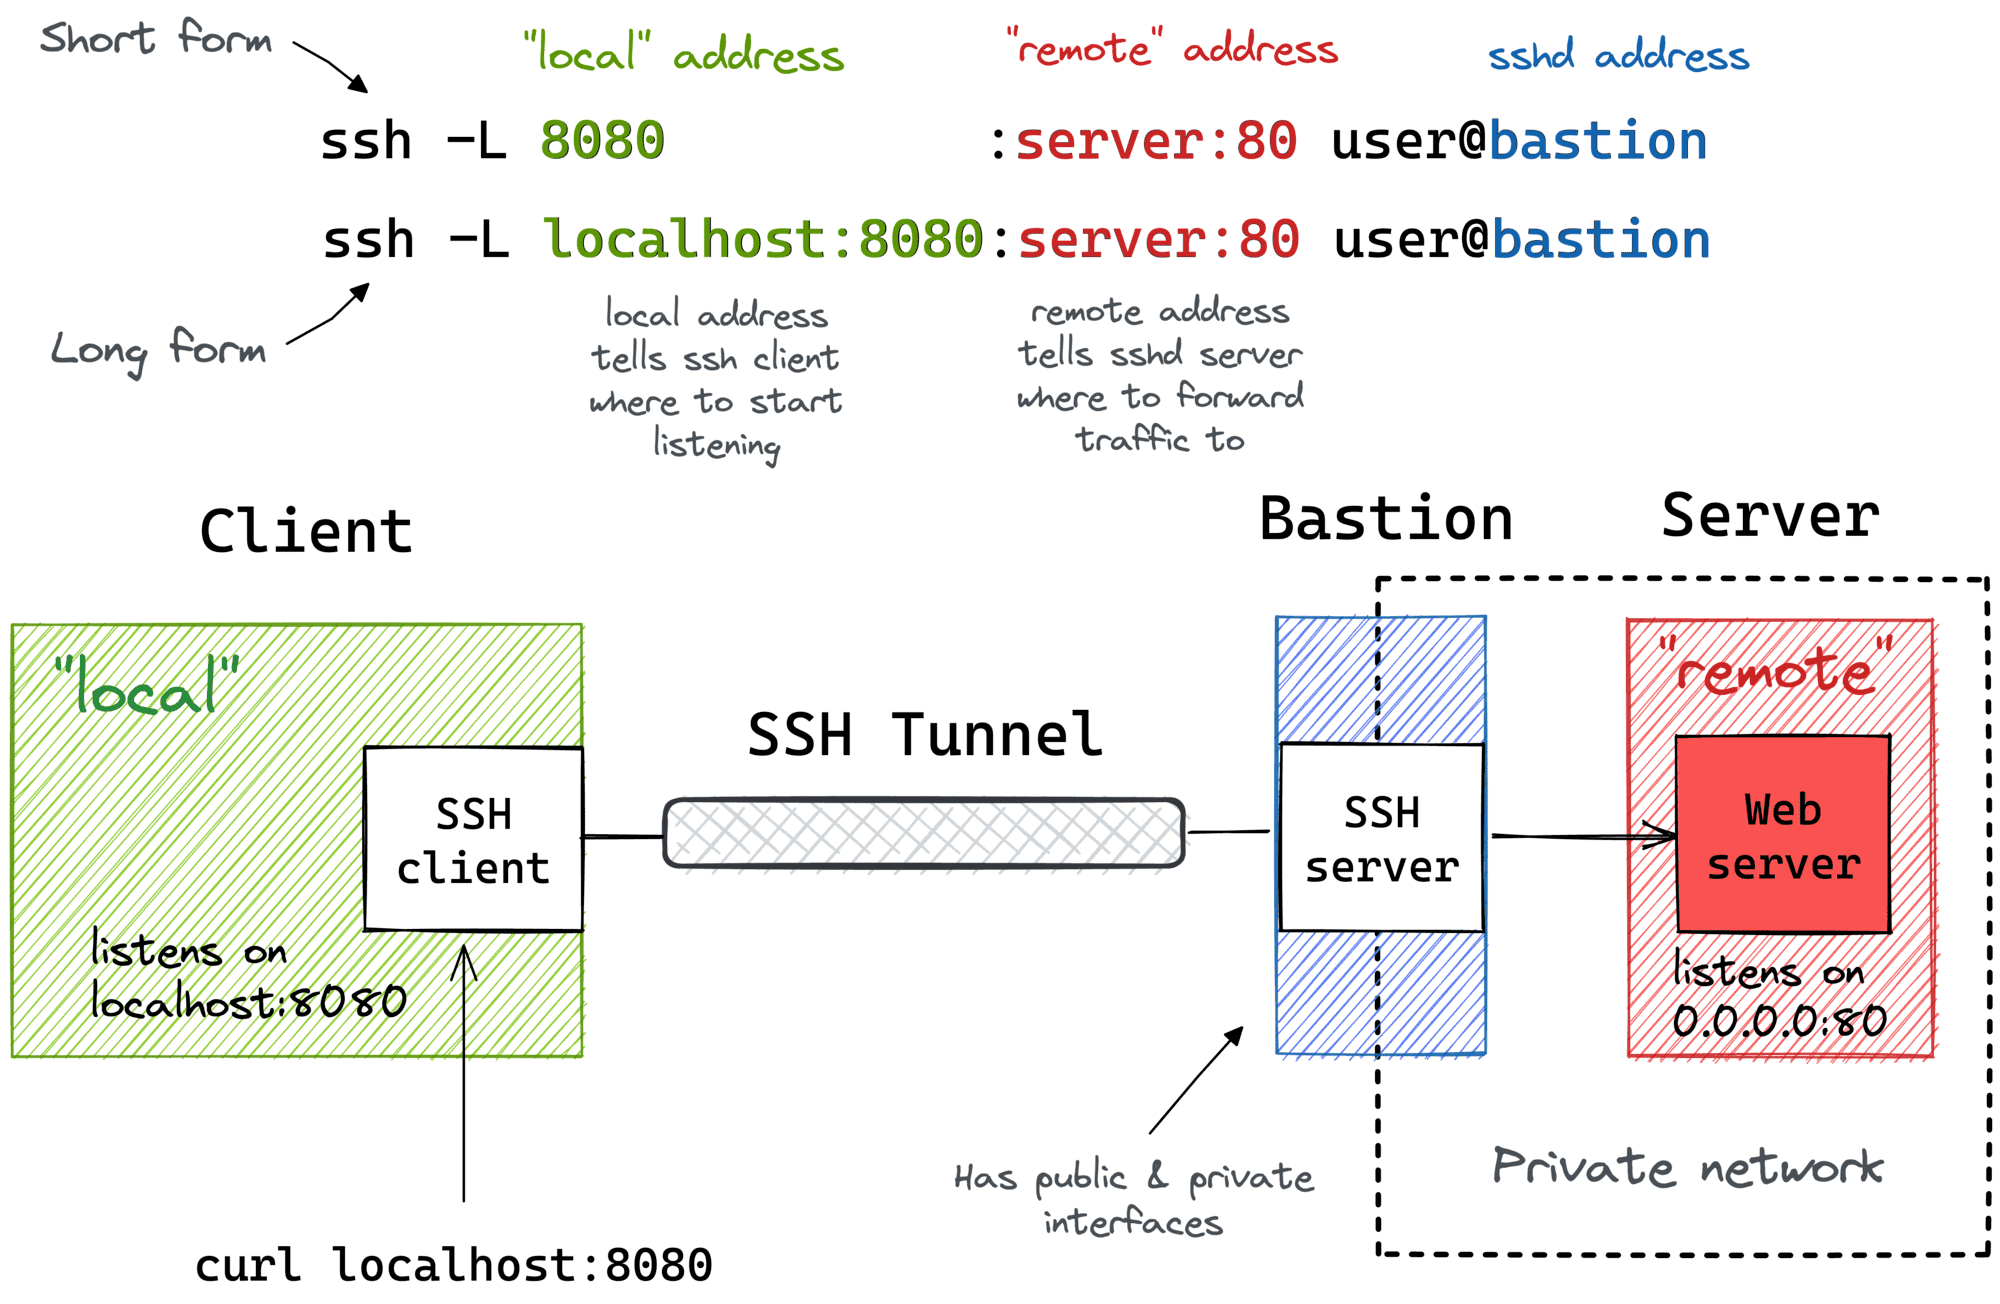
1. Port Forwarding
Port forwarding allows you to access services running on your IoT device through an SSH tunnel. This is useful for accessing web interfaces or other services securely.
2. SSH Tunneling
SSH tunneling encrypts all traffic between your Android device and the IoT device, providing an additional layer of security.
3. Automated Scripts
You can automate tasks on your IoT device by writing scripts and executing them via SSH. For example, you can create a script to back up data or update software.
Best Practices for Managing IoT Devices Remotely
To ensure smooth and secure remote management of IoT devices, follow these best practices:
- Regularly Monitor Devices: Keep an eye on your IoT devices to detect and address issues promptly.
- Backup Data: Regularly back up important data to prevent loss in case of device failure.
- Use a Firewall: Configure a firewall on your IoT device to block unauthorized access.
- Test Configurations: Regularly test your SSH configurations to ensure they are working as expected.
Conclusion
In this comprehensive guide, we have explored the world of SSH remote IoT device management on Android. From understanding the basics of SSH to advanced configurations, we have covered everything you need to know to get started. By using SSH, you can securely and efficiently manage your IoT devices from anywhere in the world.
Remember to follow best practices and implement security measures to protect your devices and data. Whether you are a beginner or an experienced user, SSH is a powerful tool that can enhance your IoT management capabilities.
If you found this guide helpful, feel free to share it with others or leave a comment below. For more articles on IoT and remote device management, check out our other resources. Happy managing!